技術
Using Visual Studio Code (VSCode) for Debugging in ROS
2022/07/12
SHARE
Although it sounds like an OS, the name Robot Operating System (ROS) is a middleware that acts as a framework and contains a set of libraries essential for developing robotics applications. ROS has been used extensively due to the flexibility it provides. ROS applications are written in C++ and Python programming languages. In this blog post, we are going to learn how to use the Visual Studio Code (VSCode) editor for debugging ROS applications.
Before we begin, please make sure to have VSCode installed on your computer. In this blog post, I am using the following versions of tools:
● VSCode v1.63.2
● ROS Noetic
● Ubuntu 20.04.3 LTS
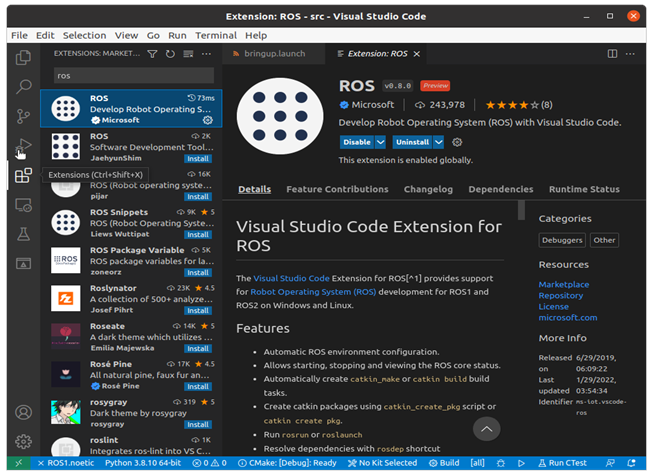
Next, we need to install the ROS extension provided by VSCode. Please press the “Ctrl + Shift + X” keys inside the VSCode editor and search for ROS. Alternatively, we can click on the “Extension” icon as shown below:

We are using beginner_tutorials, a popular ROS package that can be downloaded from the following link:
In order to open beginner_tutorials inside VSCode, please execute the “code .” command in the terminal as shown below:
user@tm:~$ cd tm_ws/src/beginner_tutorials/
user@tm:~/tm_ws/src/beginner_tutorials$ code .
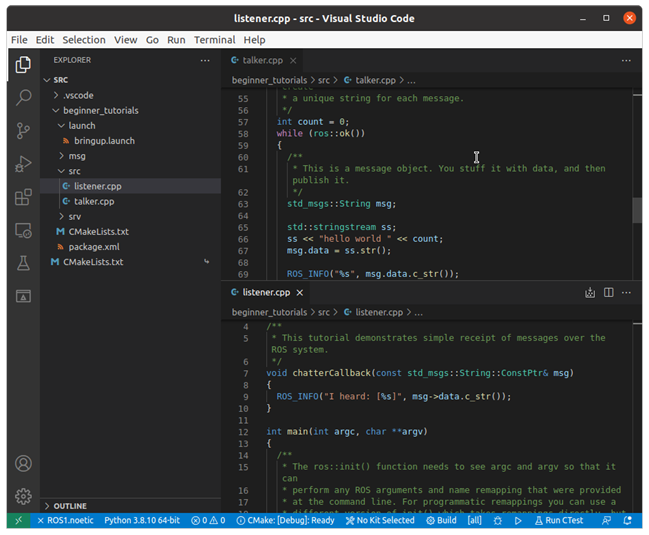
We should see the project inside VSCode, and we can play with various display styles such as multipanel display as shown below:

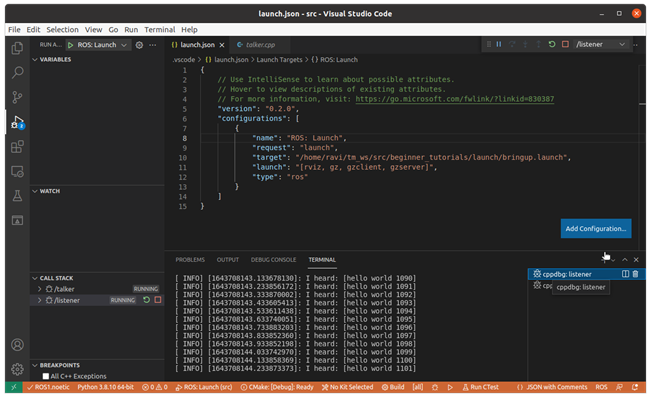
Now, in order to debug a ROS application, it is suggested to make a configuration/launch file. To do so, we need to click on the “Run and Debug” icon or press the “Ctrl + Shift + D” keys. There are no debug configurations defined for the first time, so we need to click on the “create a launch.json file” label. This opens up a wizard which is self explanatory such as Select Environment -> ROS -> Choose a request type -> ROS: Launch -> Choose a package -> beginner_tutorials -> Choose a launch file -> bringup.launch. Once done, we can see the “ROS: Launch” configuration near the top left corner next to the “Run and Debug” label. The debugging starts by clicking on the green icon or pressing the “F5” key. The output generated by talker and listener nodes can be seen inside the terminal tab as shown below:

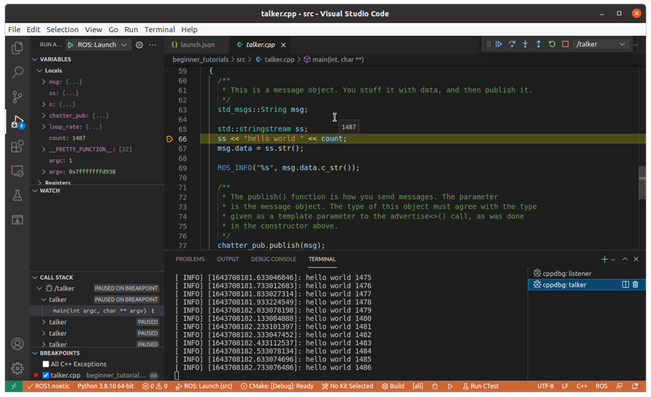
Now, suppose we want to see the value of variable “count” during the execution. We can simply add a breakpoint by clicking on the left side of any line number. The program pauses once execution reaches that place. At this point, we can hover the mouse over the variable to see its value. Other program variables, call stack, etc. are also displayed by the debugger in an easy to understand manner, as shown below:

Next, we want to run a python script inside the VSCode debugger in the same way we run CPP executables. First, we need to add a debug configuration for the python file. To do so, we need to open the launch.json file. Click on the “Add Configuration..” button on the right side of the editor and select “Python File”. It should add the “Python: Current File” configuration in the list. Do not forget to save the launch.json file by pressing the “Ctrl + S” key. The configuration may not be available in the debug list otherwise. Open the python script in the editor and select “Python Current File” configuration in the debugger. This should start the debugger process, and we can interact with the script by adding breakpoints in the same way we did before.
There are various launch configurations available inside VSCode. I strongly recommend looking at the following link for more information: https://go.microsoft.com/fwlink/?linkid=830387
TechMagicでは食産業の未来を創造する仲間を募集しています!
随時採用イベントも行っておりますので、ご興味のある方はぜひ下記リンクよりお申し込みください。
【採用イベント申込フォーム】
https://forms.gle/x4GePAw3eaGMRvbF7
その他、募集ポジションの確認やオフィス見学・カジュアル面談の希望など、お気軽にHPからご連絡ください!


